 |
Step One
Gather the necessary tools and place your daughter in front of you on a small stool or chair. Her hair should be clean, damp and relatively tangle free. Decide how you want to divide the hair and where the parts need to be. The simplest way is to draw one part straight down the middle of the head from front to back and secure the hair in two ponytails, one on each side of the head.
|
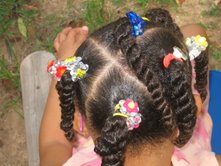
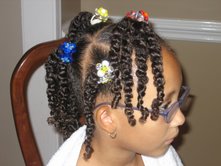
| The style I have demonstrated here has several parts that create an X on the back of my daughter's head. There are two additional parts formed by drawing a line ear to ear across the top of her head, and one final section in the top front. It is my experience that dividing the hair into several sections helps the style last longer than one simple part down the middle of the head. |
 |
Step Two
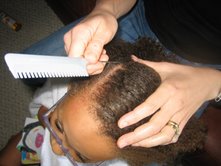
Place the rat tail comb close to the scalp in the place where you want the part to begin. Then , draw the part along the scalp, dividing the hair as you go. Once you have the initial part in place, check that it is straight and if not, use the end of the comb to coax stray hairs in the right direction.
|
|
|
Step Three
When you are satisfied with the part, use clips to hold the hair in place while you draw additional parts. Repeat until hair is sectioned and parts are straight and neat .
|
 |
Step Four
With the hair divided into sections, you are ready to begin the first Two Strand Twist. Remove one of the clips and comb through the hair with a wide tooth comb. If the hair has begun to dry, dampen it with the spray bottle. Water works as a lubricant to make combing easier . If you are struggling with tangles, it is okay to add a small amount of detangling conditioner or hair lotion.
|
|
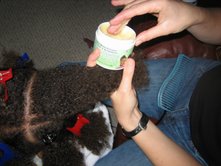
Rub a bit of pomade or hair lotion between your hands and add it to the section on which you are working. This will make the hair easier to work with and set the style.
|
 |
Step Five
Now, secure the hair with an elastic close to the scalp to make a ponytail. You will need to experiment with tautness. If it is too loose, the style will appear sloppy and quickly deteriorate but don't make the mistake of securing your daughter's hair so tightly that it damages her hair. When my daughters came home from Haiti their hair lines had receded significantly from having their hair pulled too tightly. Fortunately, their hair has filled in but it is possible to cause permanent hair loss from long term abuse.
|
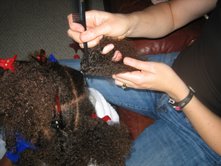 |
Step Six
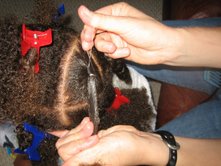
Now you are ready to begin the twist. Use the end of your rat tail comb again to divide the strand in front of you in half. Take care to make sure the two new strands are as close to the same width as possible. If the strands are uneven, the twist will appear lumpy.
|
 |
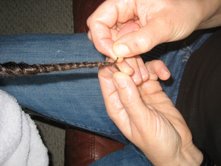
Step Seven
With one strand in each hand, cross the left section of hair under the right strand. Repeat the motion until a long twist is formed .
|
 |
Step Eight
Twist the hair right to the end, until it is very small. This was a big difference for me in the beginning between my white daughter's hair and my black daughters'. I would always end my white daughter's braid about an inch from the end of the strand and secure with an elastic. I was shocked to learn that if one simply twists or braids African hair as closely to the end as possible, it is not generally necessary to secure with an elastic because the curl will hold the style in place.
|
|
|
Congratulations, you have completed your first twist! You should now have an even, neat twist in your hand and be ready to move on to the others. Here is an example of mine (left).
|
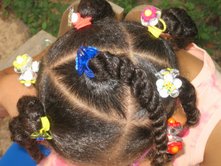 |
Although the elastics will certainly hold your daughter's hair in place it is nice to embellish this style with elastics that have brightly colored plastic balls on them. Some moms also like to place plastic barrettes on the ends to add more pizzazz. If your daughters are anything like mine they will glory in all the hardware you can add to their hair. This is a picture of the finished style from the top.
|
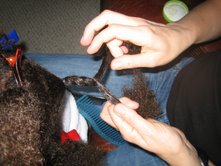
| The next Saturday night I was pleased to see the style had held up pretty well but it still needed to be spruced up for church the next day. So, working with one section at a time I refurbished it. First, I clipped the elastic with a small pair of sharp scissors. Afterwards, I untwisted the hair using as little water as necessary. I combed quickly through the section with a wide tooth comb, and added a little pomade. This time, I also put a bit of hair gel near the hair line which I smoothed with a boar bristle brush. |
 |
I replaced the elastic but instead of styling with just one large twist, I divided each section into 2 4 sections and twisted each one.
|
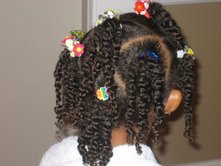 |
My daughter loved her hair like this. I think it turned out great too. Best of all, it looked like a whole new style but took very little time. I am confident it will continue to look good for the rest of the week. This is the style from the back.
:
|
|
Next time, we will move on to braids. Even if you know how to braid, the method commonly used for African hair is a bit different than that for our Caucasian daughters so you will want to stay tuned!
I would love to see some of your efforts. Feel free to e-mail me with photos but please send them in a secure way such as Kodak Gallery or Snapfish.
Check out my blog: www.everydaymiracle.wordpress.com I also offer resources for adoptive families and families of color as an Amazon affiliate through my website www.sherrigragg.com .
Sherri Gragg and her husband Michael live in Franklin, Tennessee with their 5 children. Sherri is part of the Voices of Adoption Community. Read more of Sherri's articles |